There’s no greater thrill than taking a fine trophy with ammunition you’ve carefully loaded yourself. But I’ve seen far too many hunters at the range spend hours burning pounds of powder and launching boxes of bullets downrange all in the hopeful search of that one, perfect load. My goal now is to make the entire load development reloading process far easier than you ever thought possible.
Critical steps like properly adjusting the full-length sizing die, powder selection, checking for safe loads in your rifle ,and how much you need to load to test for accuracy, is a part of what’ll be covered in this easy-to-follow process. As I share all learnings from my prior efforts, these simple steps will soon reward with groups you may not have thought possible from your favorite rifle.
Part 1: Setting Up the Full-Length Die
Click to LOAD DATA SHEET
A cartridge case- the brass- has memory. It starts out undersize in most all dimensions, so it’ll chamber in a rifle while securely holding the bullet. Once fired, it expands in every direction, and the case neck will be loose and unable to tightly hold a new bullet. A full-length die is basically a slightly undersize “chamber” in which the fired brass is pushed to reduce important dimensions allowing it to, again, securely hold a bullet and chamber easily into your rifle.
A cartridge case- the brass- has memory.
To set up your full-length die correctly, you must begin with cases that have been fired with factory loads or equivalents in your rifle. Proper use of a full-length die does not mean that you screw it down to touch the shellholder, or that it needs to be set back several turns to keep from pushing the shoulder back too far; the answer lies somewhere in-between.
With the locking ring loose and backed up, screw the full-length die down (with the ram in the up position) until the die touches the shell holder. Then back the die off/up about one-half turn. Lubricate a fired case (I like Redding Imperial Sizing Die Wax), and run it fully into the die.
Remove the case, wipe off the lubricant, and then check for smooth chambering in your rifle. Chances...
are that the die squeezed the case body resulting in the shoulder moving slightly forward. Because of this, the action may not close easily on this case, or will do so with some difficulty. If the case chambers easily, you need to back the die up about one-quarter turn, and then start over with a different fired case. You have to begin, initially, with the full-length die at a point where the sized case takes some effort to fully chamber.
If the case chambers easily, you need to back the die up about one-quarter turn, and then start over with a different fired case.
When you have a case that is resistant to chambering, screw the full-length die in or down about “one clock hour” (meaning a letter/number character on the die moves, for example, from the 4 o’clock to the 5 o’clock position). Relube that same case, resize it at the new, deeper die position, wipe off and then function test again in your rifle. It should chamber somewhat easier this time.
Continue screwing in the die in small “clock” increments (or slightly less) until the action closes easily, requiring very light force using only your thumb to push the bolt down and fully close. When you achieve this state, screw the die locking ring down to the top of the press, and lock it to the die. If you close the action on the case and feel nothing at all, then you’ve gone too far down with the die and need to back it up a position or two.
Part 2: Bullet Selection
Two years ago, a friend and I had the opportunity to hunt dozens of species on an over half-million acre cattle station in Australia. I decided to try an unknown, new-to-me, premium hunting bullet on this trip- an expanding brass monolithic. It performs like no other, and is from Cutting Edge Bullets.
The nose contained an oversize hexagonal cavity which is engineered to fracture after 1.5 – 2” of penetration, sending six razor-sharp blades radiating out in a star pattern while a blunt, sharp-edged wadcutter base (known as the Blunt Trauma Base™) continues on for straight-line complete penetration.
Oftentimes when dressing the game, the blades’ path could be seen in a star pattern on the far side of the rib cage, and some blades even exited. The effect on all game taken was very obvious with most falling to broadside, rib-to-rib shots without even...
hitting the spine or high on the shoulder. Our guide was duly impressed. He said that his job normally starts after the hunter fires, as he then has to go track and retrieve the boar from the swamp. However, with the bullets we were shooting, he just stood and watched the game fall at the shot.

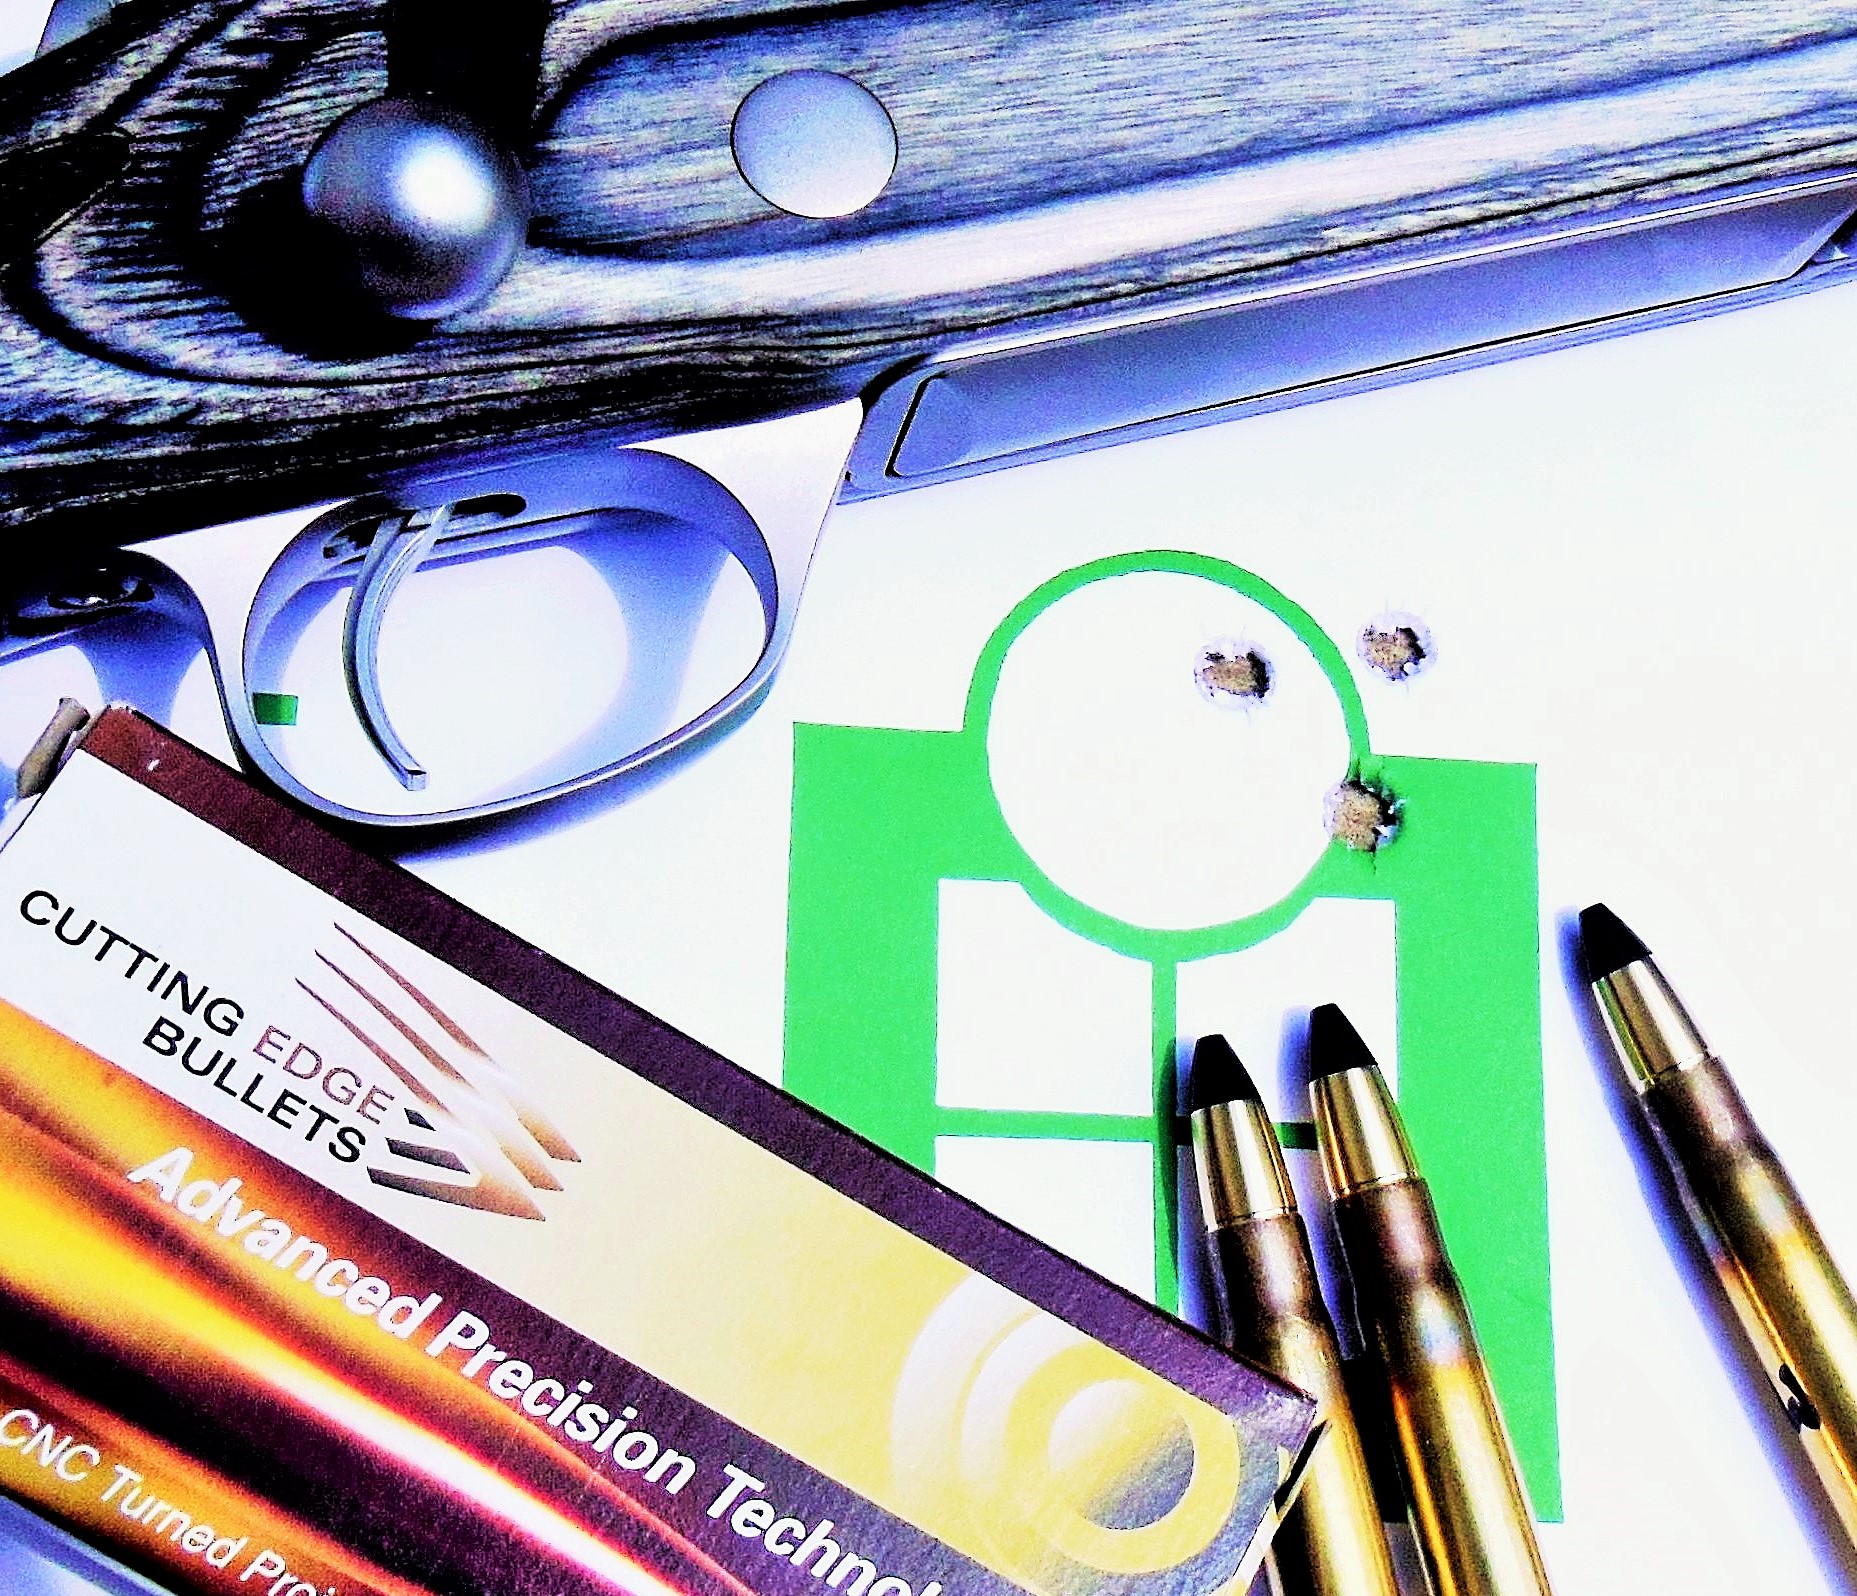
For this article, I chose to test Cutting Edge Bullets’ 130 grain brass Raptors™ and the new 150 grain Copper Raptors™ in a Steyr .30-06. In my Sako 21.3” Kodiak in .375 H&H, I used the 235 grain ER (Extended Range) Raptor™, the new expanding brass 275 grain Safari Raptors™, and 300 grain Safari Solids™. The solids are unique in that they have a 13 degree angle on the nose and a 67% of caliber-sized meplat (the flat end of the nose). Extensive testing in the lab and repeated confirmation in the field has proven this configuration to provide devastating, deep, straight-line penetration through thick skin, dense muscle, or heavy bone.
For the Cutting Edge Safari Line, pairing a solid with the slightly lighter expanding Raptor™ works out great. Develop your loads with the heavier solid, and then use the same charge for the lighter Raptor™. While the expanding version will be slightly faster, it and the heavier solid will shoot to nearly the same point of aim, making things simpler for the hunter in the field. Note that in the H&H, tested loads ran 70-80 fps faster in a 24” barreled rifle, however, in the field, no game animal would ever notice the difference.
Part 3: Determining Loaded Cartridge Length
As we’re working up loads for a hunting rifle, they need to easily load into the magazine; single shots do not have this limitation. Using a caliper, measure the maximum possible cartridge length for your magazine; let’s say it comes to 3.400”. You need to have around .030” clearance between the tip of the bullet and the front inside of the magazine for smooth feeding, so your loaded round length is limited to 3.370”.
...

The best method to determine if that’s a safe maximum length in your rifle is to use a tool like the Hornady L-N-L O.A.L. Gauge and one of their modified cases in your cartridge. The tool is basically a sliding rod inside of a tube with a thumb screw to lock the inner rod in place. A modified case is first screwed onto the end.
To use, you simply drop a chosen bullet into the case neck and adjust the sliding rod down so the bullet is very deep in the case. Then, with the bolt out of the rifle, the assembly is fully inserted into the chamber,until the case shoulder stops against the shoulder. Loosen the thumbscrew, and moderately push the inner rod and bullet forward against the rifling. As you now tighten the thumbscrew, the overall cartridge length required for that bullet to just touch the rifling has been captured.
When the assembly is removed, the bullet may remain in the barrel. If so, simply push it out to the rear using a cleaning rod inserted from the muzzle. Place that same bullet back into the case, measure the overall length, and then adjust your seating die accordingly to have either the suggested gap of .025” from the start of the rifling, or a length to properly feed from your magazine, whichever results in a shorter, loaded cartridge length.
There’s a great product I always use on my rifle brass, a neck chamfering tool designed for use with VLD (Very Low Drag) bullets. It cuts a much gentler angle on the inside of the case mouth, which helps prevent scraping any bullets as you seat them, whether VLD style or not.
Part 4: Powders
You’ll most often find the greatest accuracy variances in a rifle, with a given bullet, will be noted between different powders, not by varying the charge of a certain powder by a grain or two. THIS IS THE MOST IMPORTANT ASPECT OF WORKING UP A LOAD.
I regularly test a minimum of six powders with any given bullet. If I...
really want that bullet to shoot, then a dozen or more different propellants, may be tested. Rarely am I disappointed; usually I’m rewarded with exceptional accuracy, from at least one of the powders.

To select the powders you’ll test, I’d first start with recommended powders from the bullet manufacturer’s loading manual. The price of several cans of powders- that you currently may not have- is very small in comparison to the hunt you’ll be going on, the cost to get there, your rifle, your scope, or even the clothing you wear. If you don’t try alternates, you will never know the capabilities of your rifle.
I have many stock hunting rifles which regularly shoot into less than one-half inch with a particular bullet and powder combination, yet may only deliver groups two, three or four times that with other powders.
Part 5: Charge Weights
We’re striving to find an accurate, full-power hunting load, not just a load that is accurate at the sacrifice of velocity. So if you are working with a .308 class of cartridge calling for a top load using 46 grains of ‘ABC’ powder, you might load rounds with 44, 45, and finally, 46 grains.
With an ‘06 type of cartridge and the maximum charge calling for 55 grains of ‘LMN’, our test loads will be assembled with 53, 54, and 55 grains.
If shooting a magnum, I prefer to start 3 grains below the top load. So if powder ‘XYZ’ shows a top charge of 78 grains, we’ll load 75, 76, 77 and 78 grains. We want to progressively check published load data as being safe in our rifle.
If shooting a magnum, I prefer to start 3 grains below the top load.
I haven’t yet said- you’ll actually fire the maximum charge- it's just that in the development phase, you’ll be loading up to the maximum charge. The next steps will let you know how to proceed.
...
Part 6: Initial Loadings
Our first goal is to check our loads for safety.
You should only need to go to the range twice to find the best hunting load, unless you want to get real fussy. Our first goal is to check our loads for safety. For this, we don’t need to burn up pounds of powder and boxes of bullets.
If you’ve decided to try four powders and load in one-grain increments, starting two grains below the maximum, you’ll only be loading three rounds with each powder. Loading three incrementally increasing rounds, results in only twelve total rounds in your rifle if testing four different powders under one bullet.
Needing to load so few rounds is the reason I often select six or more powders to test. Once at the range, the few extra minutes spent loading could reward you with the load for which you’ve always been searching
Part 7: First Range Trip- Checking for Safety
As we’re working within the range of published loads, I’ll not get into detailed pressure checks like measuring case heads/belts, or trying to “read” primers for signs of excessive pressure. All we need to do is check for the functional safety of these loads in our rifle.
Be it a bolt, single shot, lever, pump or semiautomatic, the cases must eject, and the action function in a normal fashion. Another obvious sign that you need to stop shooting a load in a rifle would be burnishing or scraping of the case head face due to excessive pressure extruding the brass against the bolt face.
Be it a bolt, single shot, lever, pump or semiautomatic, the cases must eject, and the action function in a normal fashion.
These things being said, fire the loaded rounds from the lightest charge to the heaviest one powder type at a time while watching for any warning signs. If you have a chronograph, it would be great to also record the speeds. Later, when testing for accuracy, it would be nice to know for powder ‘EFG’, which one gives only 35 fps less velocity, and is shooting groups half the size of powder ‘HIJ’.
If the second (or first) round within a powder type shows any of the above cautionary signs, stop right there, and do not shoot any higher charge...
loads for that powder. You’ll need to scale back the loads of that powder for this rifle.
Just because a book lists maximum load does not mean you should just dump the top charge in the case and bang away without regard to obvious warning signs.
Part 8: Loading for Accuracy- Second Range Session

We want to develop accurate and fast hunting loads. So far, we’ve only fired nine, twelve, or maybe up to eighteen rounds of ammunition, if you went as high as trying six different powders.
You’ll most often find the greatest accuracy differences with a given bullet will be noted between different powders, not by varying a given powder-type by a grain or less. That’s the reason for trying as many powders as you can. Now you’ll load only the charge you found to be the maximum safe amount for that powder in your rifle.
As most game will not give you a chance to fire over three rounds,
With this in mind, if you only started with three or four powders, then I recommend you load up all of them to check for accuracy. If you tested six or more for safety, then you might want to pick the top three or four for velocity, based upon the published data, or your chronographed results. Later, if none of these powders give you the accuracy you desire, you can always give the others a try.
As most game will not give you a chance to fire over three rounds, I see little need in firing more than three rounds per target to test for hunting accuracy. The lowest number of rounds to be fired to determine hunting accuracy is two, three-shot groups with each powder.
I also like to start with a clean barrel for each powder, just to be fair. This also allows for barrel cooling time between powders. One fouling shot, plus two 3-shot groups, means that seven rounds is the number I will normally load to check one specific charge of a certain powder type for accuracy.
...

Loading in one grain increments, beginning two grains below, and progressing up to the maximum listed charge, requires a total of only eighteen rounds to check for safety in your rifle if trying six different powders.
After you’ve fired the first test rounds for safety, go back home and load seven rounds with each of the different powder types’ maximum charge. This results in having to load only 42 more rounds to check accuracy of full power hunting loads using those six different powders.
Normally, if I’m certain of the bullet weight I want to use, I’ll just start with 100 bullets, using the last 40 to reload with my final safe and accuracy-proven load.
Summary: The End Results
You can make the process a lot more complicated than this, but I don’t recommend it. I’ve since used this process with calibers from the .204 Ruger, up to the .50 BMG, and have been able to obtain under one-inch groups with most all rifles. The attached data sheet shows the excellent results I obtained shooting two recent additions to my rifle battery.

Just recently, a huntress with recoil limitations took the brass 130 grain Raptor™ with slightly reduced loads in her .30-06 to Africa, harvesting a half dozen plains game. Of interest is that only one bullet was recovered- all others gave complete penetration. Larger caliber Safari Raptors™ accounted for the heavy game taken by my friend, again with the Blunt Trauma Base™ most always exiting the game.
Yes, it’s nice to have deluxe rifles and the latest optics, but never forget- it’s the bullet which...
must do the work of producing a quick and humane harvest. Above all else, this should be the goal of every ethical hunter, from Alaska to Alabama, or Africa to Australia.